"An application server is technology where developers can create, test, and execute application components. Application servers are typically J2EE-based, running EJBs or other Java components. Application servers are designed to create true applications with complex business logic, and have scalability features such as load balancing, fail-over, and process distribution. In other words, it's primarily a development environment.
In contrast, Web servers are technology designed to create and deploy Web site, serving up content more so than applications. They both use Web interfaces, but Web servers are more about the interface than the back-end logic. In other words, Web servers serve up content.
As time moves on Web servers are looking more like application server, as they adopt their functionality. I can understand the confusion."
Actually the quote pretty much outlines what is going on but maybe some examples would help:
Apache HTTP server: A Web Server. It can serve up static content (HTML pages). Some extensions allow it to serve dynamic content (generated pages) - for example CGI; a new process is started to generate the dynamic page/response for a single request.
Jakarta Tomcat: Strictly speaking Tomcat is a "Web/Servlet Container", it’s not an Application Server, at least not in the J2EE sense. It does not require a separate Web server to work, however the recommended production configuration is to have a Web server serve the static content while dynamic content is delegated to Tomcat. Servlets were meant to replace CGI - in a servlet container each request is handled by a thread rather than a process - the Servlet/Web Container runs in a continuously running process. Even though a Web Container is not a full blown application server many applications are built in this "simpler" environment.
JBoss: This a J2EE application server. In addition to a Web Contianer it also has an EJB Container. While a Web container hosts servlets, an EJB Container host Enterprise Java Beans (EJBs). As of EJB 2.1 this includes stateless session beans, stateful session beans, entity beans, message-driven beans and EJB endpoints. According to Sun doctrine the business logic is supposed to be implemented in session beans and persistent objects are implemented as entity beans - presentation logic belongs in the Web container. However non-web Java clients can also access components in the EJB container via remote interfaces. The main drive behind the development of the EJB container was the desire for declarative transaction management, managed persistence and declarative security. However many found the EJB approach to be overkill, too heavyweight, and too heavy-handed. Often other technologies are used instead of an EJB container - examples: Spring for transaction management, Hibernate or iBatis for persistence management, etc. This shift is acknowledged in EJB 3 as now "Plain Old Java Objects" (POJOs) have become part of the core persistence strategy.
A J2EE application server also has to support other technologies in addition to a Web Container/EJB Container as per Enterprise Edition specification - JMS (Java Message Service) is just one example.
Other examples of J2EE application servers are BEA Weblogic (Weblogic Express is only a servlet container), IBM Websphere, Oracle Application Server, Sun Application Server, GlassFish, etc.
Your question could be answered from a design point of view. The Web Server is the software where you can handle a Web Logic of your running system, from a Java perspective, the web logic could be presented using Servlet API and JSP API and beyond.
The Application Server differs, when your system has a Business Logic, which means, the need to use a business implementations, e.g. High level network communications, high level security and high level data control, all these topics needs a minimum set of collections and APIs like EJBs, JMS technology and JNDI technology. In this case, and because of using those technologies you need an engine to take care about firing up and running those APIs, in other words, you need an Application Server. e.g. JBoss.
The Web tier is where the Web Server running, the Business tier is where the Application Server running. But, peer in mind, nowadays new topics came out! The vendors, designers and decision makers in the system architecture are increasing the gap between both servers, as you can check by your self, you can download both Application and Web servers in one engine, for example, the Sun Application server which comes with J2EE 1.4 acts like that, the JBoss Application server now could be downloaded with a Tomcat engine within it, this is because most of systems needs both parts to get the goal. And who knows what is next!
Wednesday, July 23, 2008
Thursday, July 17, 2008
Create your own MetaTrader extension (dll)
Create your own MetaTrader extension (dll)
Hi folks!
Today we are going to go step by step creating our first MetaTrader extension (dll) in C++, let's don't waste the time and start by defining what's the MetaTrader extension (dll)?
What's the MetaTrader extension (dll)?
MQL4 language give you a limited things to do with it and there are a lot of things you can not do in MQL4. To get the full control of your Windows operating system (For example, accessing the window registry or file handling APIs) you have to choices:
1- To call/use the windows common dlls and import the functions you want, and this is an example:
#import "user32.dll"
int MessageBoxA(int hWnd, string lpText, string lpCaption, int uType);
In the line above we used the #import keyword to import one of the "user32.dll" function; MessageBoxA function. Then we can use this function in our code like any normal function.
2- The second choice is creating our own dll in c++ and use it in our code the same as the common windows dlls. And that's what are we going to learn today.
The Tools you need:
I tried Visual Basic to create the MetaTrader dll but it failed, the truth is I didn't give it a lot of time and trials because the fact that the Visual Basic is not a real dll (activex) creator.
Note: If you find here any new terms that you don't understand them (like activex), if you can't ignore them you can ask me to explain them to you. But you don't need to know these terms to understand how to create your own dll.
So, the best choice was to use Visual c++, I used Microsoft Visual c++ 6 which you can download free express version of it from here: http://msdn.microsoft.com/vstudio/express/visualc/download/
Note: The version of Visual C++ used in this tutorial is Microsoft Visual c++ 6 not the express version.
Now let's create our first dll that says "hello world!"
Hello world!
1- The first step you have to run Visual C++ (Figure 1).

Figure 1 - Visual C++ 6
2- Now from File menu choose New and a dialog like that (Figure 2) will appear.

Figure 2 - New project dialog
3- From this dialog choose "MFC AppWizard (dll)" and write a name for the project in the "Project Name" field (Figure 3) and click "OK".

Figure 3 - MFC dll
Note: You can choose "Win32 Dynamic-Link Library" instead of "MFC AppWizard (dll)" but this means you will not able to use "CString" string type, CString is a string type in MFC that makes the world easier.
4- Another dialog (Figure 4) will appear to you asking you for some option. leave the default options and click "Finish" button. And when the information dialog appear click "OK".

Figure 4 - Project options
5- Congratulation! You have a new project now "demo" project which you can start to write your dll in. Please open the file "demo.cpp" and give it a look.
Now, we are going to write some code in this file:
#define MT4_EXPFUNC __declspec(dllexport)
you put this line after the lines:
#include "stdafx.h"
#include "demo.h"
#ifdef _DEBUG
#define new DEBUG_NEW
#undef THIS_FILE
static char THIS_FILE[] = __FILE__;
#endif
6- Add the end of the file "demo.cpp" and after this line:
CDemoApp theApp;
We are going to write our "Hello" function like that:
MT4_EXPFUNC void __stdcall Hello(char* say)
{
MessageBox(NULL,say,"demo",NULL);
}
7- Now we have the function "Hello" which takes a string to say it and returns no thing (void).
But the world want to know our function and in c++ to make the function availabe to the world we have to add the function name in a file called the .def file.
Now open the demo.def file and add this line (the bold line) at the end of the file:
; demo.def : Declares the module parameters for the DLL.
LIBRARY "demo"
DESCRIPTION 'demo Windows Dynamic Link Library'
EXPORTS
; Explicit exports can go here
Hello
8- Compile the dll by pressing F7, if you are a lucky man like me you will not get any errors or warnings. Search for the demo.dll in Debug folder in the Demo project folder.
In the coming article we are going to test our dll and we are going to know more about the data type passed and received to and from the dll that we can use to write more advanced dlls.
Hope you find it a useful article!
Coders' Guru
Hi folks!
In the previous part of this article we created step-by-step our first MetaTrader extension (dll) in C++ and in this article we are going to give it a test.
Also we are going to study in this article and the coming article some of the advanced topics briefly (like how to use arrays and structure in your dll).
Hope you are ready for this hard journey which deserves the effort.
Let's test our demo.dll
We are going to write some code to test our demo.dll. These are the steps we have to take before saying "Hello World!"
1- We have the demo.dll in the debug folder in your Visual C++ projects folder. Copy the demo.dll to the library folder ("MetaTrader 4\experts\libraries").
2- Open MetaEditor to create the include file which will hold the declaration of our "Hello" function. This is the code of demo.mqh
#import "demo.dll"
  void Hello(string say);
#import
Note how we have imported the dll and how we have declared the "Hello" function with the same parameters (string say) and return value (void) as the function in the dll.
This file will be saved at the Include folder (MetaTrader 4\experts\include).
3- Now, let's create the script to test the demo.dll. We are going to name it "Hello.mq4" and it must be saved at the Scripts folder (MetaTrader 4\experts\scripts).
#include

int start()
 {
  Hello ("Hello World!");
  return(0);
 }
Note how we have started the code by including the demo.mqh file to make it a part of our code.
4- Compile the script (F5) and load it now (double click it in the Navigator window in the Terminal). What did you get? a nice dialog like the one showed in figure 1, if not please check everything or email me!

Note: You have to enable the option "Allow DLL imports" in MetaTrader before using any code that import external functions (from the common windows dlls or you custom dlls like our demo.dll) that's by going to Tools -> Options -> Expert Advisors tab then checking "Allow DLL imports" (Figure 2).

Advanced Sample (ExpertSample)!
Our demo.dll was a simple one yet it was a completed dll. There's an advanced sample that shipped with MetaTrader program which include advanced programming topics. We are going to study it and thank MetaQuotes for its ideal sample.
You will find the sample of the dll in "MetaTrader 4\EXPERTS\SAMPLES"; the dll (ExpertSample.dll) in the folder "MetaTrader 4\EXPERTS\SAMPLES\ExpertSample", the include file (sampledll.mqh) in "MetaTrader 4\EXPERTS\SAMPLES\INCLUDE" and the script (ExportFunctions.mq4) in "MetaTrader 4\EXPERTS\SAMPLES".
You have to open the source code of the dll (To open the source code double click ExpertSample.dsw file) and give the code a look. You will find it more advanced and to some degree a complex one compared to the demo.dll, but don't be afraid we are going to know everything in the next article.
Tuesday, July 15, 2008
MetaTrader History Data Importing and Converting Tutorial for Quality Backtesting
MetaTrader History Data Importing and Converting Tutorial for Quality Backtesting
Backtesting MetaTrader expert advisors on historical data is a good way to test a strategy. But testing on the limited data supplied with MT4 installation gives a very poor quality of testing (usually below 50%). So, how to achieve a 90% quality in backtesting of MT4 expert advisors? It’s not that hard really, just follow this simple tutorial and you will able to test any MetaTrader EA.
1. Download a new MetaTrader 4 installation and install it to a separate folder. Be advised that a good MetaTrader historical data take up a lot of disk space, so install it to a drive with at least 1-2 Gbytes of free space. For download MT4 installation I recommend official MetaQuotes site.
2. After you install your MT4, don’t run it yet. Go to the folder you have installed it to. Go the ‘history’ folder there and delete all folders there (the actual folders names inside the ‘history’ folder may be different from those on these pictures):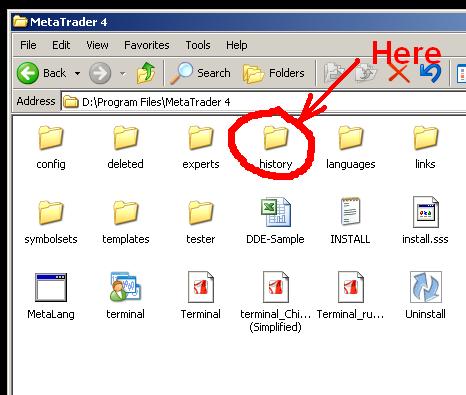

3. Run the newly installed MetaTrader and open a free demo account with whatever broker it will be offering to you (official MetaQuotes installation offers random brokers for demo account opening in its MT4). Login to your account and close all open charts (if any).
4. Adjust the MetaTrader options to allow larger charts (more bars in history):
 The close your MetaTrader.
5. Download a quality historical data for every currency pair you want to test your expert advisor on. I recommend Alpari History Center for this - download M1 data for each of the currency pairs you need.
6. Unzip the archive with M1 historical data somewhere. Rename it to comply with MT4 standard naming - i.e. EUR/USD M1 chart should be named EURUSD1.hst, GBP/USD M1 should be renamed to GBPUSD1.hst, etc.
7. Copy the renamed history file to your MetaTrader’s ‘history’ folder into your broker’s folder (overwrite if prompted):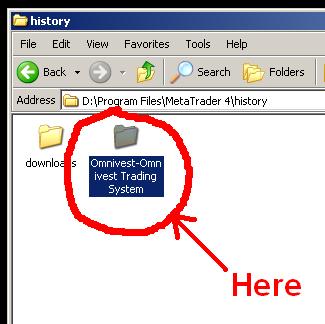
8. Launch MetaTrader 4 again. Don’t open any charts on-line, open your downloaded M1 chart offline (example shown for EUR/USD chart):

9. It might take some time for the actual chart to load, but it’s OK. Now you need to convert M1 history to every timeframe you will need. For this you need to use a period_converter script which is a standard feature of all MT4 platforms. Run it from the Scripts tab and set its ExtPeriodMultiplier input parameter to the number of minutes in the desired output timeframe. For M5 enter 5, for M15 enter 15, for M30 enter 30, for H1 enter 60, for H4 enter 240, for D1 enter 1440, for W1 enter 10080, MN isn’t convertible as there is no fixed amount of minutes in one month: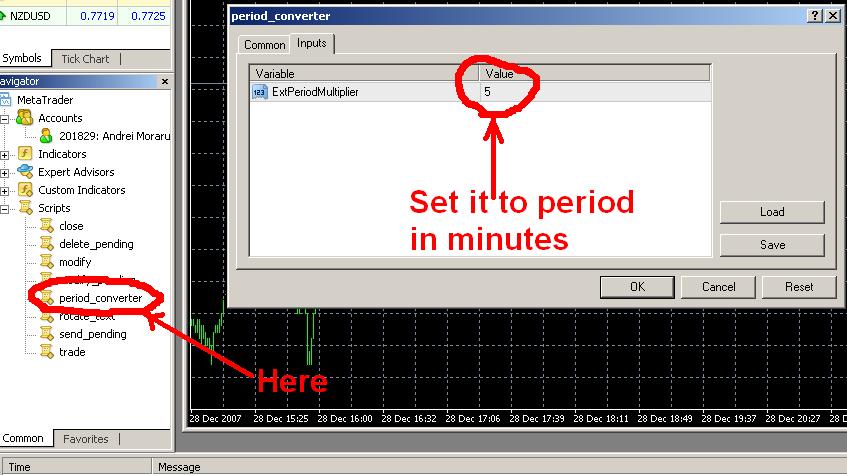
10. Wait for the script to finish its work (may take up some time; it’s more than 2 years of data after all):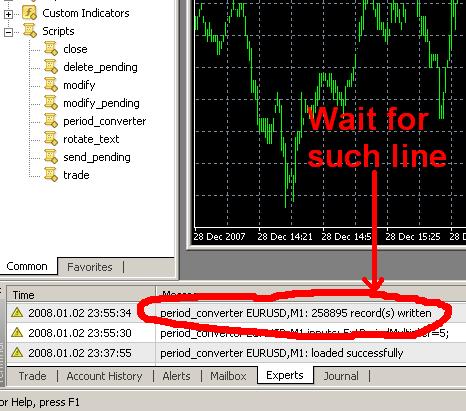
11. Repeat steps 8-10 for all timeframes you want to get.
12. Repeat steps 5-11 for all currency pairs you want to test your MT4 EAs on.
13. Voilà! Now you can enjoy a 90% quality backtesting and test every expert advisor you want on the time periods of more than 2 years. Good luck with your trading!
Subscribe to:
Posts (Atom)